
Five Minute Maker: Origami Dragon (Advanced Edition)
Five Minute Maker: Origami Dragon (Advanced Edition)
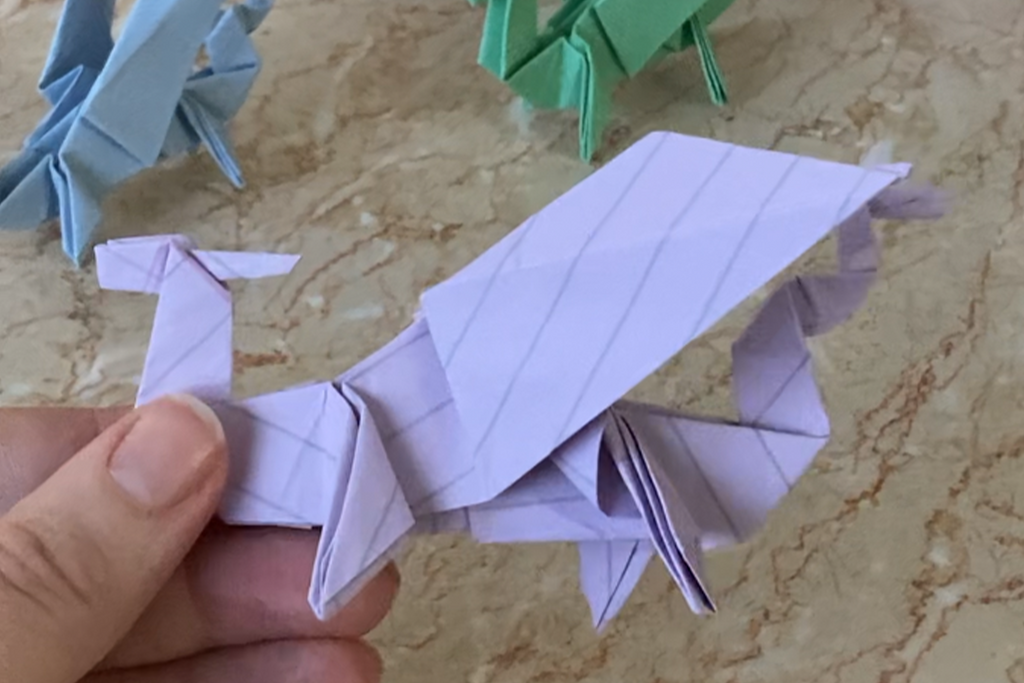
Turn a single piece of paper into a fearsome origami dragon. It is a quick fold once you get the hang of it, but don't rush the process while you are learning. The first time may take a while.
Supplies:
📝 Paper
Tools:
✂️ Scissors
🦴 Bone folder (optional)
Watch the video:
Instructions:
- Start with a square piece of paper. A piece on the larger side is going to make things easier, especially if this is your first try!
- Fold your paper diagonally, corner to corner, both ways. Open the paper up then fold diagonally again, opposite corner to opposite corner, once again folding both ways.
- TIP! Make the folds crisp with a bone folding tool, or your fingers on a firm work surface, for a tidy result at the end.
- Fold the paper in half, lining up the top edge with the bottom edge, and folding it both ways. Open up the paper and fold in half again the opposite way, lining up the left and right edges. Fold both ways.
- With the paper facing upward and squared on your work surface, bring the top left corner and the bottom right corner over to meet the bottom left corner. The top right corner will follow suit laying on top.
- Rotate the folded square so that the open corner is at the bottom and the closed corner is at the top. Fold the two lower sides to line up with the vertical line down the middle, and crease. Turn your paper over and repeat the same step on the opposite side.
- Fold down the triangle section at the top. Crease well in both directions, then unfold.
- Open the fold back up to look like a square.
- Lift the bottom corner. Using the fold you made by folding the top triangle as the centre point, the sides will naturally fold inward to create a diamond shape. Burnish the folds, the repeat on the opposite side.
- Fold the top corners of each side down to meet the bottom corners again, creating a kit shape. In origami, this shape is called the "bird base".
- Fold the top corner down to meet the horizontal fold line.
- Open the folded paper model slightly and you'll see that this fold you just made makes a square shape on the paper. Push that square shape down, inverting it inside the folded kite shape.
- At the top, fold each corner down making a fold from the centre line to the outer corner, making a flap. Do both sides, front and back.
- Like turning the page of a book, fold the right edge of the across to meet the lift edge. Repeat on the opposite side too.
- Lift the bottom corner all of the way up. The sides will naturally fold inward to create a diamond shape. Similar to a fold we did earlier, burnish the folds, the repeat on the opposite side.
- Next, align the right edge of the upper flap along the centre fold and crease only until the vertical line. Open it back up to see a crease running diagonally to the middle. Repeat in the opposite direction with the left edge of the upper flap. You will now have a creased triangle shape. Bring the top point down and fold the creases so that you have a narrow triangle positioned horizontally. Mirror this step on the opposite side, making sure that the new triangle shapes are pointed in the same direction.
- Fold the two bottom flaps upward and crease well.
- Fold the top of each flap outward lining up the inner edge with the horizontal bottom edge of their respective sides then creasing. Return those flaps to their upward positions, then unfolding them to point downward again.
- Using the diagonal creased that you just made on each side, fold the flap on each side up and in between the layers, reversing the direction of the folds and pointing outward on each side.
- On the left-hand side, fold the upper edge of the paper down to meet the bottom edge and crease well. Unfold this new flat and refold it inside the model. Repeat this step on the opposite side, then again on the front and back of the right side. These points will eventually become the neck and tail of the dragon.
- But first, let's make the wings! Starting at the centre connection point at the base, take the flap and fold it upward at an angle and crease. Do the same on the opposite side.
- Look to the small triangles on either side of the wings. Those will become the dragon's legs. To create the back legs, fold the top edges of the triangles on the left-side toward the center and pointing down.
- Creating the front legs, fold the small triangles on the right-side in toward the the centre line, then downward matching the direction of the back legs.
- OPTIONAL STEP: To make the wings look fuller, pull the back layer out of the wing. A new diagonal crease will form and you can flatten it into place once you are happy with the positioning.
- Let's make the neck. Make a diagonal fold from the base of where the neck would be upward. Flip it inside out so that the neck is standing upward.
- Halfway up the nack, make another diagonal fold in the opposite direction. Like the previous step, fold this piece inside out along the fold to create the head.
- About 1/3 of the way down the head, fold the tip back on itself making sure that the point sticks out past the back of the head a little bit. Flip that fold inside out so that it creates horns sticking out the top of the head.
- The last piece of this origami dragon is to finish the tail! Fold the tail upward at an angle. Like we did with the neck, flip that fold inside out to stick straight up.
- About halfway up the tail, make another diagonal fold in the opposite direction. Invert it to hold the position.
- Make one more diagonal fold near the end of the tail and invert it to hold the position and finish your origami dragon! 🐲